 Art in the home doesn't have to be expensive! With a little creative painting and garage sales, thrifty shopping and discounted events, you can give your home the flare you want and show your style! Oh! And watching a WHOLE lotta HGTV for inspiration!
As an author and an artist, I'm happy to say that my artistic abilities expand out to the environment around me…mainly, our home. Additionally, I find myself blessed with a tremendously creative man as my life partner and soul mate, so we are overjoyed to combine our talents to this art we are creating with the house in which we live. With our love for fantasy and European culture, we are putting an Old World European flare to our little castle with a touch of magic, being very eclectic in our selections, as we want to populate our living quarters with the things we love–not just a segregated and determined style to govern our hand.
As such, it is my blessing to post a few pictures of the before and after of our home to show our decorating efforts. Please forgive the state of some of the “before” pictures as I don't really have anything cleaner to show. But I desperately wanted to show you how nothing (other than clutter and mess–which didn't belong to us, but that's another story) had been done to the place, so we had a blank canvas to work with, so to speak.
Project #1 – The Bathroom
This was the first project we worked on. I had already formed ideas in my head about what we wanted for this little space and we had already changed the light fixtures to the dark, brushed bronze style that will eventually make it throughout our home. When my mother came out to visit last spring (April 2009), I shared my ideas and my frustrations about what to do with the window treatments. That's all she needed to get inspired and we jumped right into pulling together materials I'd already had. She is where I inherited a lot of my artistic talent (www.MillieLouArt.com) and we made a great team! With some faux painting, sewing and creative shopping, we were able to transform this little room into an Old World European bath sanctuary! (Click on the pictures below if you wish to see a larger view.)
 |
Again, sorry about the mess. Anyway, I would like to point out the chrome “dressing room” lights over the mirror. Unfortunately, I don't have a better picture than this and you can't really see them. The mirror frame is chrome, too. |
 |
In this picture, I want to highlight the plunger with its CAUTION yellow handle and the shower curtain, which is just the plain, thick plastic draping. Great for keeping water in the tub AND it has these nifty little suction cups along the left and right edges so you can secure the curtain to the wall while you shower. Wonderful for keeping in water and cold air out! Functional, but it has no style.Also, note the walls are already painted the sea green color, which we played on in the redecorating. |
 |
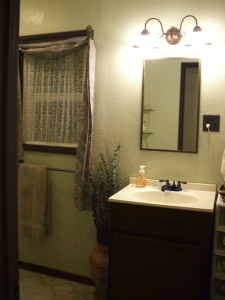
Now the fun begins with our AFTER pictures! In this picture, you can see the light fixture has been changed. Believe it or not, this fixture cost us NOTHING! It was given to us by a member of the family.We primed and painted the frame of the mirror and the window scarf brackets to match the fixture. As a result, the mirror really pops! |
 |
A close up of the vase sitting next to the sink cabinet. I used to work at Michael's craft store and had purchased this plaster vase, but wasn't sure what to do with it. The colors went great with the sea green walls and the current color of the cabinet, but note the dark brown colors in the recesses and cracks of the piece; those go well with the dark fixtures. My mother used to work for a florist, so we picked up some dried flowers on discount at Michael's and voila! (Dried flowers & vase: $10)Additionally, I bought the baskets in the background (by the sink and on the floor) and the small, moss green washcloths from the Dollar Tree for our guest towels. The plaque hanging over the towels was ALSO bought at the Dollar Tree – an unfinished wood piece – and I wood burned a poem on it to encourage our guests to use the towels: “Guest Towels: Deposit thy towels in the basket below and we thank thee for keeping our bathroom aglow!” The whole towel ensemble with plaque cost us $15 (12 towels, 2 baskets and a plaque). |
 |
We purchased these light fixtures – FIVE in a pack – at a discount warehouse for $50! The bathroom is the first place we've put them up, but we plan on putting the other four matching fixtures throughout the house – living room, kitchen, hallway and laundry room. |
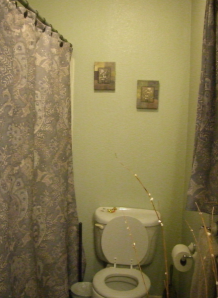 |
Ah! Now isn't that better! I purchased the two pictures buy generic cialis 20 mg above the toilet at the 99c store! They had muted colors of moss green, mauve, mustard yellow and grays that I thought went well with the bathroom in my apartment, which had gray tiles. Look how great they go with this bathroom!I purchased the shower curtains at full price at Target for $25, but I had to splurge…they were just too beautiful to pass up! These curtains are OVER the plastic curtain with the great functionality.
Note the black handle of the plunger now (to the left of the toilet)! I painted it black and did a gold patina/sponging to, again, match the brushed dark bronze of the light fixtures. You can't see it, but I also purchased a moss green, plastic plate from target ($2.99) for the plunger to rest on. It matches with the color scheme AND keeps the floor clean. Function with style! I love it! |
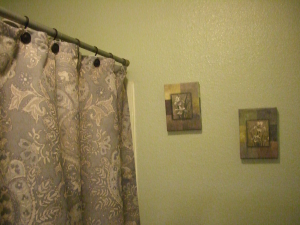 |
A close-up of the pictures and the shower curtains. I also splurged on the shower hooks. No painting necessary on these and for $9, we have the look we want complete. |
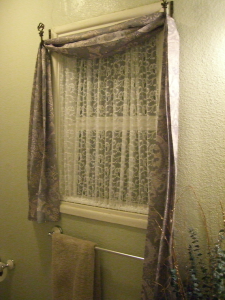 |
A closer look at the window treatments, which started this whole project. I had a beautiful set of lace sheers that I had bought, when I was living back in Germany, that I was loathe to get rid of. Mom came up with the idea of two adjustable rods – one at the top and bottom – with sheer curtains strung between them; an idea she used at another place she lived. These sheers were perfect! I cut the sheers up to the proper height and width of the window and sewed the hem on the top and bottom for the rods…and there ya have it!As for the scarf, which was also Mom's idea, I capitalized on a little accident I had. The beautiful shower curtain I bought had actually been purchased just prior to my mother's visit…but I splashed hair dye on it!! Very upsetting (and yes, I do dye my hair…I'm forty-one, ya know, with LOTS of gray hair)!! Since I needed a new shower curtain anyway, we picked up another one and used the damaged curtain to make the matching scarf. I was thrilled it didn't have to go to waste! I still have some left over, which I'm sure to use in some other project in the house. |
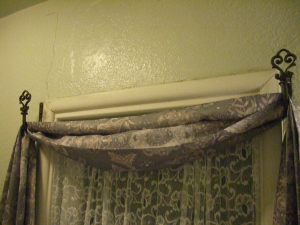 |
This picture is to show you the detail of the window scarf brackets ($8). They were originally a golden color, but Mom painted them to match…you guessed it…the light fixtures! Note the detail of the lace sheers. I love those curtains! |
 |
For the finishing touch, we had these corner shelves that were sea green on the metal and the pressboard shelf was covered with a scratched up bamboo print paper. The whole piece just blended right into the walls.I asked Mom to do her famous faux marble painting on the shelf and OMG what a difference!! We've had several guests swear they thought it was real marble. |
All-in-all, with a little painting and gathering of items already in the house, this redesign cost…
Light fixture above mirror: FREE
Ceiling fixture: $10
Dried flowers & vase: $10
Guest Towel Ensemble: $15
Pictures above Loo: $2
Shower curtain: $25
Shower hooks: $9
Plate for plunger: $3
Window Scarf: $25
Window Scarf brackets: $8
Sheers: FREE
TOTAL: $107!!
Another Improvement
Throughout the house, we have decided to bring in the warmth of the Old World European style with dark chocolate brown accents via the fixtures, molding, framing, etc. I like to take our remodeling ideas into Photoshop and mock them up to be sure they're what we really want. Boy does it save money!! So, here is a sneak preview of further improvements on the bathroom, which will only take a pint of paint to accomplish. BEFORE (current) and AFTER (mock-up) of bringing the warmth into the bathroom: (drum roll)
All we're doing is painting the chrome towel racks, base board, the cabinet, window frame, door frame and door to the bathroom. The dark brown light plate will actually be a newly carved light plate by DeWayne (*smiles*) stained dark walnut. I've also mocked up the water fixtures, but that will come later. Those babies are expensive! This new idea is only costing about $12 for the paint.
I hope you enjoyed what I shared. My purpose in this post is to show you how you can add elegence to your home for very little money. Also, keep in mind that you don't have to do it all at once. Each of these little changes could have been done over a period of time and that's good to keep in mind during this hard economic period of which we're all feeling the bite.
What About You?
Have you done some money-saving improvements on your home? Have a special style you're creating you'd like to share? Are you expressing your artistic talents through home improvement? Post it on your blog and leave a comment here with a permalink so we can see what you've done!
That's my two pence…
Arial 😉

